If you are interested in technology and want a good way to get CLE credit this year, we are approaching the Early Bird Deadline (February 17) for ABA TECHSHOW 2012, which takes place March 29 to 31 in Chicago. I’m speaking at two sessions. First, on March 29th, I’m on a panel called Smartphone Wars where I will be talking about using the iPhone in a law practice, Dan Pinnington will discuss Blackberry, and Jennifer Ellis will discuss Android. It will be interesting to compare and contrasts the hottest smartphones. Second, on March 31st, Josh Barrett and I will once again present 60 iOS Apps for Lawyers in 60 Minutes, a fast-paced look at some of the best iPad and iPhone apps. Because Reid Trautz is the Chair of TECHSHOW 2012, this is the first year that he won’t be a part of 60 Apps, but I’m thrilled that Brett Burney will be taking his place. Josh Barrett and I are also hosting a Taste of TECHSHOW dinner on Thursday, March 29; more details are here if you’d like to join us. [UPDATE 2/14/12: Our dinner is now sold out, but there are sometimes last minute cancellations, so get on the waiting list on that same page if you want to try to join us.] And now, on to the news of note from the past week:
Speaking of Brett Burney, the Lexblog Network interviewed Burney at the recent LegalTech New York regarding the use of iPads by lawyers.
Horace Dediu of Asymco put together some fascinating graphs that show how Apple has risen to prominence in the mobile phone market. The third graph is particularly interesting, showing that Apple sees 40% of mobile phone revenue, and a staggering 75% of all profits on mobile phones.
More interesting numbers: Matt Brian of The Next Web reports that 70% of all smartphones sold by AT&T and Verizon last quarter were iPhones.
Jeff Gray of Toronto newspaper The Globe and Mail reports that more and more Canadian lawyers are using the iPhone over the Canadian-produced BlackBerry.
Arizona attorney Joseph Kanefield, who is currently president of the Arizona Bar, wrote about how he uses the iPhone and iPad in his law practice in this article for Arizona Attorney magazine.
Daniel Eran Dilger of AppleInsider offers some theories on why IT departments at large companies are embracing the iPhone more than Android.
Similarly, Ryan Faas of Computerworld looks back at the use of Apple products in enterprise over the years.
Here’s another story of an iPhone thief being caught by Find My iPhone. As C.J. Hughes of the New York Times reports, this time, it was the police who thought to take advantage of the service.
Former Apple executive Bob Borchers provided some details on the early development of the iPhone in a lecture reported on by Katie Marsal of AppleInsider. Borchers said that Steve Jobs “wanted to create something that was so instrumental and integrated in peoples’ lives that you’d rather leave your wallet at home than your iPhone.”
Trial presentation consultant Ted Brooks reviewed iJury, a voir dire app for the iPad.
Virginia attorney Rob Dean of WalkingOffice reviews Tom Mighell’s book iPad in One Hour for Lawyers. (My review of that book is here.)
And finally, I recently reviewed the Chef Sleeve, a device to protect your iPad in a kitchen and other environment. But for those of you who need EXTREME protection from your iPad, Traci Dauphin of Cult of Mac reviews the Grid Tablet by Watershed, a bag for the iPad that Navy Seals use so that they can use their iPads at a depth of up to 300 feet. If you need to practice law while you are deep underwater, than You’ll want to spend $100 on this:
Your iPhone is in your shirt pocket, you lean over when you happen to be near a body of water such as, say, a toilet, and the iPhone falls in the water. Yikes! Fortunately, this hasn’t happened to me yet, but it does seem like it is just a matter of time. Thus, my interest was piqued when I saw the website iMore “review” a $6.95 product called the Thirsty Bag from iFixit, a company well-known for fixing iPhones. You place an iPhone (or camera or iPod or other electronic device) in the Thirsty Bag as soon as possible after it gets wet, and the two Molecular Sieve pouches in the bag remove all of the water from the device so that it (hopefully) works again. You can also remove the two pouches, put them in a larger Ziploc bag, and use the product to fix a wet iPad.
I put the word “review” in quotes because iMore didn’t actually dunk an iPhone to try out this product, they simply describe how it is supposed to work, much like I am doing here. Even though I do have some old iPhones in my house, I don’t want to risk destroying them simply to review a $7 product, so I don’t plan to review the Thirsty Bag myself either. Hopefully, I will never be the unfortunate victim of the scenario outlined at the start of this post, but I am thinking about buying one just in case. Obviously, to take advantage of a Thirsty Bag, you have to already have it in your possession so that it is nearby soon after your iPhone takes a swim. I suppose it is a $7 insurance policy, albeit one that is not guaranteed to work.
What about other solutions? A few years ago, Andy Ihnatko of the Chicago Sun Times got Verizon to give him a few phones that he could destroy, and he tried out several methods of drying them out. His full article, and the video segment he did for the CBS Early Show, are here. In short, he found that kitty litter or white rice can sometimes do the trick. The iFixit website claims that the Thirsty Bag is better for these reasons:
Unfortunately, rice is not an effective desiccant for a couple of reasons. Rice has a low capacity for atmospheric absorption. It may absorb the liquid water on the case, but our real problem are the tiny drops inside. Also, as rice sits on your shelf, and the shelf at the store before you bought it, in unsealed boxes and bags it slowly sucks in water out of the atmosphere around it, reaching it’s absorption capacity. Thirsty Bag Molecular Sieve pouches are sealed at the factory where they are made, and not exposed the the atmosphere for longer than 2 minutes during packaging where they are resealed and prepared for you.
Whether you purchase a Thirsty Bag or just have a gameplan for quickly getting kitty litter or rice, it is good to spend time now thinking about what you will do if your iPhone or iPad gets wet.
When I travel, I bring with me the USB Power Adapter and the Dock Connector to USB cable that came with my iPhone or iPad so that I can charge my iPhone overnight. It is usually easy to find an outlet on the wall of a hotel room, but you can’t always find a table that is both near the plug and at the right height. Thus, I often have a cable running from the power adapter to the floor, and my iPhone just sits on the floor, which always makes me nervous that I might step on it at night. The clever folks at BlueLounge created a product called the MiniDock, a stand that plugs in to your Apple USB Power Adapter so that the iPhone can rest on the adapter itself without the need for a cord. A simple picture shows exactly what this product does:
Because the MiniDock is so tiny, it makes a great travel accessory. Indeed, if you carry a MiniDock, you might not even need to also travel with the Dock Connector to USB cable, although I’ll probably continue to carry that cable because sometimes it is useful to have.
In addition to being useful during travel, this is a great device to use in the kitchen so that your iPhone can charge without being on the counter, which not only saves you counter space but also helps to protect the iPhone if you happen to spill something on the counter or push something else around that could knock the iPhone off of the counter.
The device works with a variety of different sized iPhones and iPods, and to allow all of these devices to rest comfortably in the MiniDock, it comes with three “Spacer Bumpers” of different sizes that stick onto the MiniDock to fill the gap between your device and the back panel of the MiniDock. With an iPhone 4 or 4S, I find that the largest bumper works best.
Note that, like most stands, the MiniDock probably won’t work if your iPhone is in a case, unless it is a thin case with the right size opening around the connector on the bottom. Having said that, if your case is of the right size, it would not only work with the MiniDock but you also may not need to use a Spacer Bumper.
This device it so simple that there isn’t much more to say about it, except that when I look at it it often makes me wonder why I didn’t think of it first. The MiniDock works great, and I suspect that almost every iPhone owner would find this device useful.
Apple announced earlier this week that it broke records with its phenomenal sales quarter, and unsurprisingly this had an effect on others. AT&T announced that it sold a record 9.4 million smartphones during the December quarter, and 7.6 million of those — 80% — were iPhones. Verizon announced that it sold 4.2 million iPhones in the December quarter, representing 55% of its smartphone sales. We haven’t seen numbers from Sprint yet, but I’m sure that they also sold millions of iPhones last quarter. For all of the attorneys who are new iPhone owners and new to this site … welcome! Check out the Index to Prior Posts to catch up with everyone else. And now, the news of note for the past week:
The most interesting article that I read this past week was on the cover of the Sunday edition of the New York Times. How the U.S. Lost Out on iPhone Work by Charles Duhigg and Keith Bradsher explains why consumer electronics in general, and iPhones and iPads in particular, are made in China. Your first thought may be “cheaper labor,” and while that is a part of the explanation, it has more to do with the fact that the U.S. lacks manufacturing companies with the abilities of these Chinese companies. Definitely worth reading.
The default wallpaper for the iPhone’s lock screen is a beautiful picture of Earth that was released by NASA in 2002. I described the background of that picture in my Blue Marble post from March of 2010. This week, NASA posted on its Flickr page Blue Marble 2012, an even higher definition view of Earth created by combining several images taken by a NASA satellite on January 4, 2012. I find it impossible to view pictures like this without finding myself thinking about man’s place in the universe — or, if I’m in a less philosophical mood, at least humming the Disney “It’s a small world after all” song. And now that I’ve mentioned it, the song is probably in your head too. (Sorry!) Anyway, perhaps it is time for Apple to update the iPhone wallpaper image.
Utah attorney Greg Hoole recommends iPad apps in an article for Law Technology News.
This week, the U.S. Supreme Court released its decision in U.S. v. Jones, ruling that the Fourth Amendment applies when a police officer attaches a GPS device to a vehicle to monitor its movements. All of us with iPhones are walking around carrying a GPS unit, so this decision means that the police cannot monitor us … right? Well, maybe not. Rebecca Rosen has an interesting article in The Atlantic that explains how limited the decision really is. A fascinating read.
Mel Martin of TUAW describes a new app from Epson that lets an iPhone or iPad wirelessly connect to certain Epson projectors.
Vlad Savon of The Verge reports on a study by Pew which estimates that almost 20% of adults in the U.S. now own a tablet computer, such as an iPad or an e-book reader.
Charles Starrett of iLounge reminds us that when you are typing on an iPad and you make a mistake, you can always tap the .?123 key to see an Undo button. Great tip.
Tony Bradley of PCWorld explains that AT&T has changed its iPhone rate plans. Current customers are grandfathered into their their existing plans, but going forward, AT&T’s plans becoming $5 more expensive, but with that price increase you get more data. $20 gets you 300MB (instead of $15 for 200MB), $30 gets you 3GB (instead of $25 for 2GB) and $50 gets you 5GB plus hotspot tethering (instead of $45 for 4GB plus tethering).
St. Louis attorney Geri Dreiling has some tips on LawyerTechReview for replacing your legal pad with an iPad.
And finally, I love the great Siri technology on my iPhone 4S, and if you also use a 4S, perhaps you do too. But do you REALLY love Siri? The always funny guys at Scoopertino imagined the next great product from Apple, Siri Pro for those who are, well, in love with Siri. Click here or on the picture below to read all about it.
I just started writing a column for the TechnoLawyer BigLaw newsletter, and I encourage all iPhone J.D. readers to sign up for a free subscription so that you can keep up with the articles that I write for BigLaw.
A little background: since 1997, TechnoLawyer has distributed free e-mail newsletters for attorneys. Today, TechnoLawyer publishes nine different newsletters. Some of my favorites include BlawgWorld (a guide to what is new and noteworthy on the legal web), LitigationWorld (tips for litigators) and FatFriday (a weekly grab bag of of various topics such a product reviews and tips and tricks). In 2009, TechnoLawyer started to publish BigLaw to address topics that are of particular interest to attorneys who work at midsize and large law firms. Articles in BigLaw are written by a mix of current and former corporate counsel, attorneys at medium-to-large law firms and legal journalists. The BigLaw e-mail newsletter is typically sent out every Tuesday.
My articles in BigLaw will come out about once a month and will cover issues that are of particular interest to attorneys at a law firm who use an iPhone or iPad. My first article appeared in the January 17, 2012 newsletter and discussed law firm support for iPads, including whether law firms should purchase iPads for all of their attorneys.
I encourage you to click here to subscribe to BigLaw to keep up with my articles and the other great articles in that newsletter. And while you are there, you should sign up for some of the other TechnoLawyer newsletters as well; they are free, and they are always full of useful information. If you want to catch up on older feature articles from BigLaw, they are posted on the BigLaw Blog several weeks after they appear in the newsletter.
Yesterday, Apple released the results for its 2012 fiscal first quarter (which ran from September 25, 2011 to December 31, 2011) and held a call with analysts to discuss the results. This is the 13th time that I have discussed an Apple quarterly earnings call on iPhone J.D., and over that time I’ve frequently remarked that Apple had a record-setting quarter, which was true this time as well. Of course the fiscal first quarter is always Apple’s best quarter because it includes holiday sales, but this past quarter was something really special for Apple. Not only was it the best quarter in Apple’s history, it blew away the previous best quarter. The previous record was announced on July 19, 2011, when Apple revealed sales of $28.57 billion and profit of $7.31 billion in its 2011 fiscal third quarter. Yesterday, Apple announced sales of $46.33 billion and profit of $13.06 billion. This wasn’t just an amazing quarter from Apple’s perspective, it was an amazing quarter from any company’s perspective. David Goldman of CNN reports that this was the second most profitable quarter of any U.S. company ever, behind only ExxonMobil’s record-setting $14.8 billion quarter in the Fall of 2008 when oil prices were at an all-time high. Wow.
Apple sold a record 37 million iPhones last quarter. That is twice what it sold the same quarter a year ago. Take a look at the first graph in this article by Philip Michaels of Macworld to see just how incredible a quarter this was for iPhone sales.
iPad sales were a record 15.4 million last quarter.
What about the iPod touch, the iPhone-without-a-phone? Apple announced that it sold 15.4 million iPods last quarter and indicated that about 10 million of those are the iPod touch.
To date, “combining the iPhone, iPad and iPod touch, we surpassed 315 million cumulative iOS device sales, selling more than 62 million in the December quarter.” That is a huge market for app developers.
Speaking of app developers, there are now over 550,000 apps in the App Store, including 170,000 iPad-specific apps. To date, app developers have made over $4 billion, including over $700 million in the last quarter alone.
Apple announced that nearly all Fortune 500 companies now approve and support the iPhone and the iPad. “Real estate agents at Coldwell Banker and Sotheby’s access sales presentations and use custom iPad apps in the field. Retail chains such as Bed Bath & Beyond use iPads to deliver key business metrics on the sales floor. Wineries are using iPads in their vineyards to call up weather data and soil profiles, record quality assessments and make decisions on the spot about whether to harvest their grapes. And in this past quarter, Chinese airline EVA has also deployed iPads to pilots and crew for flight manuals, documentation and training.”
85 million people are signed up for iCloud, Apple’s system for keeping files in the cloud and syncing them across multiple devices. Apple CEO Tim Cook said that iCloud is “a fundamental shift, recognizing that people had numerous devices and they wanted the bulk of their content in the cloud, and easily accessible from all the devices. And, you know, I think we’re seeing the response from that, and with 85 million customers in just 3 months, it is a very, very important part. It’s just not a product. It’s a strategy for the next decade.”
Apple CEO Tim Cook predicts an incredible future for the iPad, noting that the iPad is “a huge opportunity for Apple over time. And as I’ve said before, I truly believe, and many others in the company believe, that there will come a day that the tablet market and units is larger than the PC market. In fact, it’s interesting to note that in the U.S., it’s clear from the IDC’s recent data on desktop PCs in the U.S. that tablets exceeded desktop PC sales last quarter in the U.S. And so I think you can already see different indicators that there is significant momentum in this space.”
There are many ways to use an iPad to replace a legal pad. Numerous apps let you type notes using the on screen keyboard, but that only works well if your iPad is on a flat, stable surface. A good alternative is to use a stylus along with an app that lets you draw on the screen, and the most useful apps let you draw in a window that reduces the size of what you type so that you can get a large number of words on a page. Note Taker HD is a perfect example of one of these apps, and for a long time now, that is the app that I have been using and recommending to use with a stylus. But I have often been asked if there is a way to take handwritten notes and then convert those notes to searchable text. Notes Plus is a $6.99 note-taking app for the iPad, and the recently-released 3.0 version of Notes Plus gives you the option of purchasing a $1.99 in-app upgrade to add handwriting recognition. The developer of Notes Plus sent me a free copy of the app to review and I purchased the in-app upgrade. It works farily well, but Notes Plus can be confusing to use because the app has so many features.
Writing with a stylus
If you read my review of Note Taker HD or if you use the app yourself, then you understand the concept (and advantages) of writing in one window and having what you write show up in a smaller version elsewhere on the page. Notes Plus includes the same feature. When you are using the pen function in the app, you hold down your stylus for a second and a window pops up in which you can write.
(By the way, my favorite stylus right now is still the Kensington Virtuoso Stylus for Tablet that I reviewed last August.)
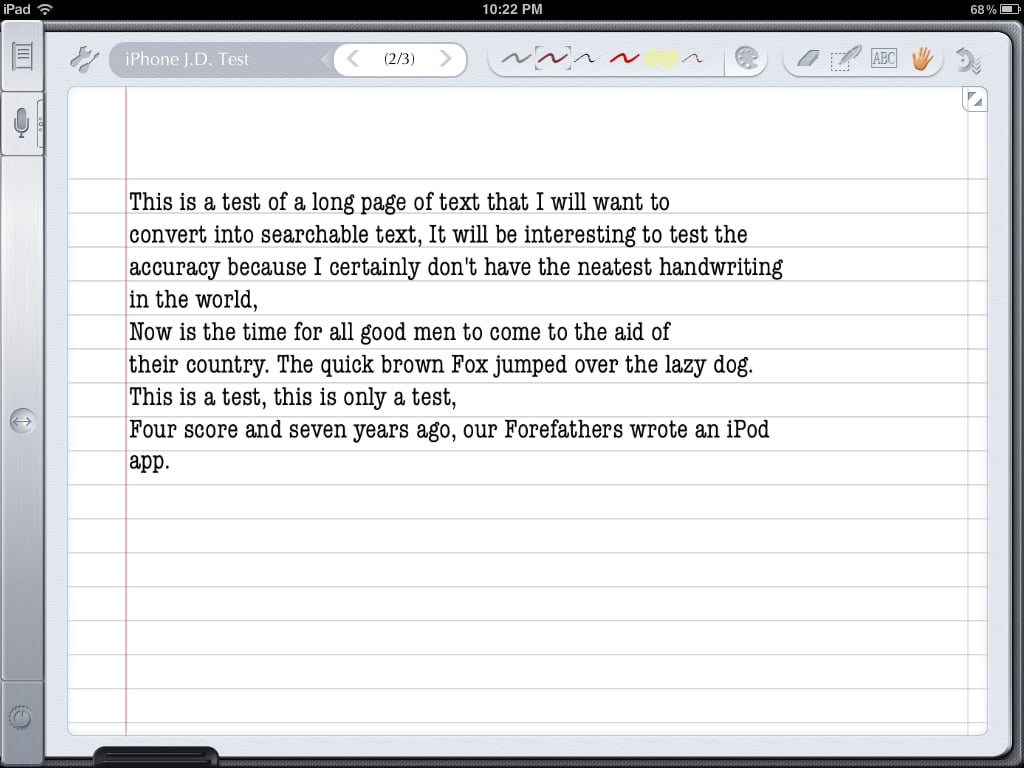
The biggest difference between writing in Notes Plus versus Note Taker HD is that when you near the end of the window and you pick up your stylus to continue writing in the left side of the window, Notes Plus actually shows you what you have previously written, making it very easy to place the next letter in the correct location. In the following image, for example, you can see that I am ready to write a word after “the” but I am about to reach the end of the window, so I can instead start writing just after the “the” in the left side of the window.
Notes Plus also gives you the option of moving the handwriting window to another part of the screen, although frankly I haven’t found that to be very useful. Unfortunately, I find that Notes Plus is a little slower than Note Taker HD; there is a fraction of a second greater delay between the time that you move your stylus and the “ink” shows up on the screen. The difference is slight, but I mention this because even Note Taker HD on an iPad 2 feels like it is just barely keeping up with your writing, so it is unfortunate that Notes Plus is a tiny bit slower (perhaps because the app is taking the time to show you what you have already written in the left side of the window?)
Handwriting recognition
When you draw a circle around something in Notes Plus, the app selects whatever it is that you have circled, gives it an outline appearance so you understand what was selected and what was not selected, and then gives you the option to do something with the selected writing such as copy it, delete it, or recognize the handwriting. (Or you can tell Notes Plus that you just intended to draw a circle.) The first time that you choose to recognize handwriting, you are given the option of paying $1.99 for the in-app upgrade. (The developer of Notes Plus pays another company for the MyScript technology that handles the handwriting recognition, so he made this an in-app upgrade for those who want the feature rather than adding $2 to the price of the app.) Once the purchase is made, the handwriting recognition works very well. In my tests it was often perfect and otherwise darn close. For example, in the test shown in the next picture, the only thing it got wrong is that it thought a lowercase f was an uppercase F, and frankly the fault there is likely my sloppy handwriting, not the MyScript technology:
[UPDATE: Indiana attorney Robert Hunt posted a comment to this post asking if the app can convert cursive handwriting to text. Yes, it does. And my cursive handwriting is worse than my block letters, so the handwriting recognition engine really is quite impressive.]
Why would you want to convert your handwriting into text? First, text is easier to read, although frankly that is not enough of a reason for me. Others may have trouble reading my handwriting, but I don’t. Second, text is searchable. This is the key advantage for me. If I take several pages of handwritten notes during a meeting or a hearing, I cannot do a full-text search to find a specific term. But if I use Notes Plus to select all of my handwriting on a page and convert it to text, then I can search for specific terms when I am later looking for something in my notes.
If you are just working with words, conversion to text is very useful. It gets more complicated, however, if page layout makes a difference to you, for example if you are also drawing things on a page next to your text. Unless you use the perfect size font, the text will not occupy the same space on the page as your handwriting, so if you intended to draw a picture, a star, etc. next to your text, it will not line up correctly after conversion.
Shapes
And this is a good point to mention that Notes Plus has the neat ability to create perfect shapes. If you draw a standard shape like a line, a circle, a square, a triangle, etc., the app recognizes what you are doing and converts it to a perfect shape. Thus, you can draw this:
And the app automatically changes it to this (although you have the option to change it back if that was not your intent):
Thus, it is easy to include a nice diagram in your notes with perfect curves and straight lines. Or you can just draw a box around some important words and have it look perfect.
Plus much more
And that is just the tip of the iceberg of what Notes Plus can do. You can use the microphone button at the top left to record audio along with your notes. You can switch to a full screen mode (in landscape view) to remove all menus and maximize your space for taking notes. There is a highlighter. You can insert pictures. You can select different backgrond paper, and you can even import a PDF to write on top of that. You can scratch through something you wrote to erase it. You can move anything that you wrote to a different location. You can import and export files to Google Docs and Dropbox. (Dropbox support is currently broken, but the developer says that an updated version that fixes Dropbox support has already been submitted to the App Store and should be available soon.) And there are even more features of the app that I am just beginning to learn.
Unfortunately, there is a price to pay for all of these features: complexity. Even though I have spent countless hours learning how to use the app, reading help files, reading the website, etc., I often get confused on how to perform the various functions in the app. As a result, I have some hesitation recommending Notes Plus, especially to beginner iPad users. It reminds me of Photoshop on the computer; Photoshop can create some amazing images, but there is a very steep learning curve, and if you are someone (like me) who only uses Photoshop occasionally, you can easily get lost trying to figure out what each button does and how to get something done. Notes Plus is not as complex as Photoshop, but there is nevertheless a steep learning curve. I love that this app is so powerful, but I must tell you that it sometimes drives me crazy.
Conclusion
I decided to take a look at Notes Plus in the summer of 2011 because so many attorneys had told me that it was their favorite app for taking notes. I waited to post this review because the developer has been working on version 3.0 for the last six months and I wanted to wait and see how the app would work with handwriting recognition and other features added. I still haven’t yet decided whether this app will replace Note Taker HD as my favorite iPad app for taking notes, but it might. I love all of the advanced features, such as handwriting recognition and shape creation, but I don’t (yet) feel as efficient when using this app and it is a minor annoyance that the app isn’t quite as fast as Note Taker HD. Nevertheless, if you are looking for a sophisticated app for taking notes and you don’t mind putting in the time to learn how to control all of the bells and whistles, you’ll definitely want to check out Notes Plus.
The Congressional Record is the official, daily record of the proceedings and debates of the United States Congress. There are four parts of each issue: (1) House of Representatives, (2) Senate, (3) Extension of Remarks, and (4) the Daily Digest summary of the day’s activities. You can access individual issues of the Congressional Record through FDsys, a service of the U.S. Government Printing Office (GPO). There is now an easier way to view individual issues on your iPad because the Library of Congress partnered with the GPO to release a free app last week called, appropriately enough, The Congressional Record.
From the main screen of the app, you select a specific day then tap the view button. The app provides access to January 4, 1995 (the 104th Congress) to the present.
You then see up to four buttons for the four parts of the daily Congressional Record, such proceedings in the Senate. (You only see buttons for the parts that are available for that day.) A fifth button displays the entire Congressional Record for that day.
When you view the text, you are presented with a PDF file, so it looks exactly like the printed Congressional Record (and exactly like what you would get from the FDsys website).
When a specific issue is displayed, you can search for specific terms in that issue. Search results start to appear as you type, and the terms are highlighted in the text in blue. Just tap on an occurance to see it.
You can only search within a specific issue; if you want to search across multiple issues, you’ll need to use another resource. And you need to know the specific day that you want; the app doesn’t include any sort of index. Once an issue is displayed, the app lets you e-mail that issue to someone, or you can send it to another app on your iPad that handles PDFs.
On the main page of the app, at the bottom, the app shows you what is going on today on the House and Senate floor, and you can tap on an entry to jump to a corresponding page on the Library of Congress THOMAS website.
This app only works on the iPad, not the iPhone, but that makes sense; it would be difficult to read an issue on the tiny iPhone screen. [UPDATE: As of July of 2012, the app now works on the iPhone too. This is a nice update, but you need to squint to read the CR on a small screen!] You can get more information on the app from this post by Andrew Weber, the Legislative Information Systems Manager the Law Library of Congress, and in this Library of Congress press release.
For the attorneys, lobbyists and others for whom the Congressional Record is a valuable resource, you now have an easy way to access it from your iPad.
Click here to get The Congressional Record (free):
Yesterday, at the Gugenheim Museum in New York City, Apple announced a new version of its iBooks app that supports enhanced, interactive textbooks, and also announced software to create these cool e-books. For now, the focus is on education, the idea being that instead of students carrying tons of heavy books that get outdated, they carry one iPad with textbooks that are updated and more engaging. I’m reminded of my science textbook when I was in First Grade at St. Edward’s in 1975 that opened with a picture of the moon and the statement that “someday, man will walk on the moon.” Time will tell what impact this has on schools, but as a member of a profession that does a heck of a lot of reading and writing, I’m intrigued to see the future of iBooks beyond the education field. If you want to learn more, Macworld has comprehensive coverage of yesterday’s announcement. As for the rest of the news of note from the past week:
Virginia attorney Rob Dean reviews Notability, an app for taking notes.
South Carolina attorney Bill Latham provides some basic, but nevertheless very helpful, iPad tips useful to lawyers (and others).
Massachusetts lawyer Robert Ambrogi reviews iProBono, an app that helps Arkansas attorneys sign-up for pro bono cases.
Litigation consultant Ted Brooks reviews iJury, an app to assist with voir dire.
South Carolina attorney Justin Kahn mentions an update to the WestlawNext app for the iPad; now you can share folders with others.
Charles Starrett of iLounge reports that Apple has joined the Fair Labor Association and is seeking to improve working conditions at manufacturing facilities in countries like China that assemble Apple hardware such as the iPhone and iPad.
John Brownlee of Cult of Mac reports on iConvert, a product sold at Brookstone (shown at the right) that converts your iPad into a scanner.
Jim Dalrymple of The Loop reports on a new survey from IDG Connect that shows that shows an increasing use of iPads by business professionals.
Daniel Eran Dilger of AppleInsider reports on a new study from security firm Check Point that surveyed thousands of IT professionals and concluded that the iPhone is overtaking the BlackBerry in popularity, while Android is considered the “most risky” mobile platform.
Similarly, Brad Reed of Network World reports that the iPhone 4S sold very well in November and December, according to the latest data from Nielsen, while BlackBerry market share continues to decline.
Matt Brian of The Next Web reports that Japanese car manufacturer Nissan is launching an iPhone case that uses special paint (already used on Nissan cars) that will allow the case to repair itself if it gets scratched.
I reviewed the Camera+ iPhone app back in August of 2010 when it added what was at the time a unique feature — the ability to press the iPhone’s volume button to take a picture. Apple wasn’t thrilled about an app developer using the hardware button this way, so the app was removed from the App Store for a while and then allowed to return when the feature was removed. Of course, Apple itself added this feature to its own Camera app when iOS 5 was released in October of 2011. I mention Camera+ today because even though the app only costs a buck (it used to cost $2), the developer recently revealed that it has earned $5,125,844 to date, and that is after Apple takes its 30% cut of the sale price. It just goes to show you that with a good product (and some good luck), an iPhone app developer can do quite well.
Attorneys love the Dropbox service, especially on the iPhone and iPad, and Jessica Guynn of the Los Angeles Times interviewed Drew Houston, the developer of Dropbox, and wrote this interesting article.
A man in the front row at a performance of the New York Philharmonic had a brand new iPhone in his pocket. He had the mute switch enabled, but for some reason an alarm had been set on his iPhone and it went off during the performance — causing the conductor to halt the performance. This resulted in a flurry of stories from sources such as The New York Times and editorials from people like John Gruber, Andy Ihnatko and Calfornia attorney David Sparks. Those are all good reads, but the morale of the story is: remember that just becuase your iPhone is in “mute” mode, it can still make noise. For example, an alarm will still sound — good if you are using your iPhone to wake up in the morning and forgot that the mute switch was on, bad if you are in court.
That reminds me of an embarrassing situation that I once created with my iPad during a meeting, and hopefully you can learn from my mistake. I was typing notes on my iPad during a conference using the Apple external Bluetooth keyboard, and apparently I hit the F8/play button without realizing it. That triggered the Music app to resume playback, and caused a song that I had been listening to on my iPad earlier that morning start to play again, causing quite a few people around me to stare and wonder I was disrupting the meeting by playing music. Oops. That experience led me to remove all music from my iPad so that it would never happen again. (I use my iPhone to listen to music, not my iPad.)
And finally, if you are going to make noise with your iPhone, why not go all the way? At this year’s CES convention, Behringer introduced a $29,999 product called the iNuke Boom, a REALLY REALLY BIG speaker for the iPhone. Click here for the story from Buster Heine of Cult of Mac, although perhaps the picture from that story really says it all:
One of the best features of iOS 5 on the iPhone is the Reminders app. Your iPhone can remind you to do tasks on a specific date and time, which is very useful, but I especially love location-based reminders that remind you to do something when you arrive at, or leave, a specific location such as your office, your home, or any other address in your Contacts list. Yesterday, Lex Friedman of Macworld wrote a great article about using the Reminders app that I strongly encourage you to read so that you can fully take advantage of reminders on the iPhone. Friedman also linked to an article he wrote last November about how you can share reminders with another iPhone user using iCloud. For example, you can share a grocery list with your spouse, and either of you can use your iPhone (or iPad) to update the shared list.
If you have an iPhone 4S, the Reminders app is even more handy because you can just tell your iPhone to remind you of something, which is much faster than tapping the app icon and typing in all of the information needed to create a reminder. Just tell your iPhone “Remind me to pick up my dry cleaning when I leave work” and Siri takes care of the rest.
One tip not mentioned by Friedman conerns using the Reminders app if you sync your iPhone with a Microsoft Exhchange server. The default setting is to sync Mail, Contacts, Calendars … and Reminders. That sounds like a good idea — the Reminders app on your iPhone can share items with the Tasks tab in Microsoft Outlook — but be aware that if you have this turned on, you will not be able to use location-based reminders because that is not a feature supported by Microsoft Office. To fix this, go to Settings -> Mail, Contacts, Calendars and then tap on your Exchange account. Then simply make sure that Reminders is set to off:
Unless it is really important to you for your tasks to show up in Outlook on your computer, I recommend that you keep this turned off so that you can have your iPhone remind you to do things based upon where you are located.


 John Brownlee of Cult of Mac

