
I have many photo albums created by my mother containing pictures from when I was young, but those albums contain very few pictures from the 1980s. I recently figured out why. It appears that from around 1980 to 1986, my parents had most of their pictures developed as slides. Indeed, I remember my family gathering in the living room where we would set up the projector to look at those slides on a screen so we could all enjoy them together. But nowadays, I don’t have access to a working projector, and even if I did, that’s not how I would want to look at the pictures: today we use the Apple TV to look at pictures on my large TV screen, or we look at pictures on the iPhone, iPad, or computer. Although I have used various methods to digitize pictures over the last 30 years, I no longer have a flatbed scanner with a film scanning feature. So I decided to purchase a Kodak Slide N Scan Digital Film Scanner on Amazon ($179.99). Thanks to that device, I now have well over 1,000 old pictures of family and friends, holidays, family trips, and more that are now readily available to me on my Apple TV and all of my devices. Plus, it is now easy to share them with others—no projector required.
Options for scanning pictures on film
If you have old slides or photo negatives to scan, you have many options at many price levels. To get the best possible scan, send your slides or negatives to a commercial service. Online services typically charge $0.40 to $0.90 per slide. If you don’t trust putting your precious photos in the mail, your local camera/photography store probably offers a similar service. One of the oldest and best camera and photography stores in the New Orleans area where I live, Lakeside Photoworks, charges between $1.50 and $5.00 per slide depending upon how many you are scanning, and negatives cost $1.50 per frame.
If you want to do the scanning yourself, some document scanners support film scanning. I used to own a printer/scanner that did this, but it was slow to scan each slide or negative. You can also purchase an expensive dedicated film scanner from a company like Plustek. Prices range from about $400 to well over $1,000. The Epson Perfection V850 Pro scanner gets good reviews, but it costs $1,299 on Amazon. Another high-end choice is the Plustek OpticFilm 8200i SE, which is $399 on Amazon, and the quality of its scans is reportedly very good, but each scan takes several minutes. There are also some complicated ways to scan pictures using a DSLR camera with a macro lens. For some people and some types of photos, one of these may be the best option.
The alternative is a less expensive scanner like the Kodak Slide N Scan Digital Film Scanner. The cost is much less, at around $180, and another significant advantage is that it takes barely more than a second to scan each image. This avoids the painstaking frustration of waiting for other devices to finish each scan. The pictures I was scanning were taken with simple snap-and-shoot cameras, so the quality was nothing special to begin with. And my only goal was to walk down memory lane, not to submit something to a publication. An inexpensive and fast scanner seemed like the best option for me, even though I did consider the other options.

I am happy with my choice. The price was right, it did not take me very long to scan well over 1,000 slides and a few film negatives, and it was great fun to convert each slide carousel that was, for all intents and purposes, unusable into digital pictures that I can see and share. It is especially nice to have lots of photos of loved ones who have passed away over the years.

How it works
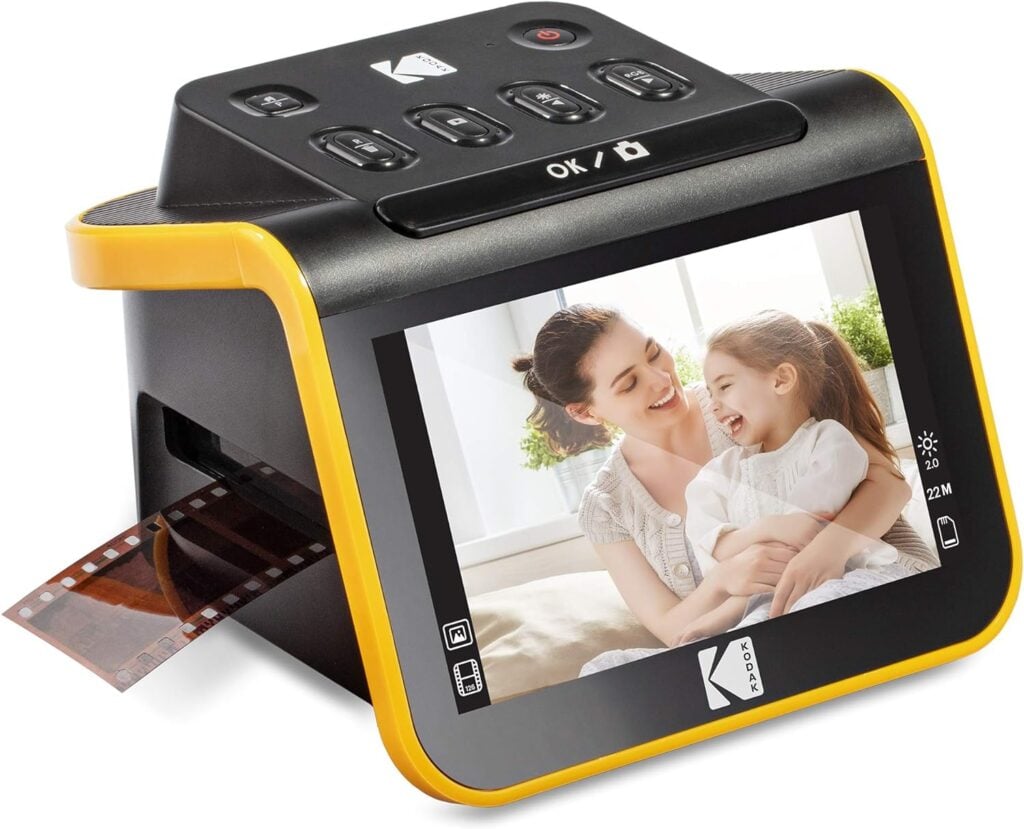
The Kodak Digital Film Scanner takes a picture of the image on film and saves it to an SD card of up to 32GB capacity (which you must provide). You can use this device to adjust the brightness level when you scan (which I only rarely found helpful, but it did make a difference on a few photos) or the RGB levels (which I never found helpful and I recommend that you don’t touch; it is better to adjust the color after you take the picture). For the most part, you can ignore those controls. Instead, there is only one button to really worry about: the big button you press to scan a photo when you see it on the 5-inch screen.

One of the best features of this device is that it is fast and easy to scan multiple slides. To use the device, insert the slide holder from the right side of the device. Then, put the first slide in the holder. Then, put a second slide in the holder, which will push that first slide until it is centered on the 5-inch screen. Press the button to take a picture, and then push the third side in, which makes the second one move into the center. Repeat this process for each of your slides. Just keep sliding in the slides and pressing the button each time a picture is centered. It takes between one and two seconds per slide.
If you have film negatives, use the scan negative setting and add the film negative adapter to the slide holder. Finally, you push in the strip of negatives from the right side. As each image is centered on the screen, press the button to save the pictures to the SD card, then push the negative even more to get to the next image.

This device’s native resolution for scans is 14 megapixels, but you can choose either 14 or 22 megapixels. The larger images are created using software interpolation. I liked the idea of working with slightly larger pictures, so I typically used the 22 megapixel mode. The picture quality is the same for either mode.
When you are done scanning a set of negatives or a set of slides—which for me meant at the end of each slide carousel—remove the SD card from the Kodak device and use an SD card reader to load the scans on your computer. This device also comes with a cord to connect the Kodak device directly to your computer but I never saw a need to do that because it was so easy to work with an SD card.
In fact, I never even used a computer. I used an iPad for everything. The Kodak device uses a USB-C connector for charging, so I sat at my dining room table and connected a USB-C to USB-C cord from my iPad to the scanner to provide the scanner with power while I scanned a set of slides. Then, I imported the images from the SD card to my iPad using a HyperDrive 6-in-1 USB-C Hub that I’ve owned for many years. I’m sure you can use any SD reader for the iPad that supports USB-C. The Photos app on the iPad will detect an SD card and allow you to import the pictures and then delete them from the SD card after import.
You could be done at this point, but you will get much better results if you take the time to adjust the scans. Some pictures will need to be cropped and/or rotated from landscape to portrait orientation, and that is an easy fix you can make using the Photos app or just about any other photography app on the iPad. I also recommend that you adjust the colors to make every image look its best, especially since, after many decades, some colors on the film will start to fade more than others.
My tool of choice for fixing photos is a great iPad app called Photomator. I purchased that app so long ago that I no longer remember how much I paid. You can currently use the app with a $29.99 annual subscription or a $79.99 subscription, but note that this app is so good that Apple recently purchased it, and I don’t know what that will mean for the app’s price in the future. One thing I like about Photomator is that it has a one-button enhance button that often does just about everything you need to adjust things like colors. Also, this app makes it easy to adjust the red/green/blue levels, frequently changing a dull photo into something that really pops. I also like Photomator on the iPad because you can use an Apple Pencil and the Repair tool to quickly eliminate dust, hairs, or other blemishes that often show up in a picture when you scan slides or negatives.
My final step was to use the Photos app to adjust the date/time of the photo—which was often just an educated guess for these pictures taken decades ago—and to set the location where the photo was taken (if I knew it). The Photos app lets you adjust the location for a single image or for multiple images, but for more precise adjustments of metadata such as location, I recommend the Metapho app.
Quality of the scans
Although I’m sure that the quality of some of these photos would have been much better if I had used a commercial service or a slow-and-expensive high-end scanner, I was happy with the quality of the pictures I got from this Kodak scanner. Some individual photos were poor quality or even unusable, but I could see from just holding up the slide to a light that the quality of many of those slides had simply deteriorated over time. For example, some of the film was completely faded. On others, some chemical reactions took place over time, damaging some or all of the photos. I don’t see how even an expensive solution would have changed anything for those photos. Fortunately, most of the slides I worked with were in pretty good shape.
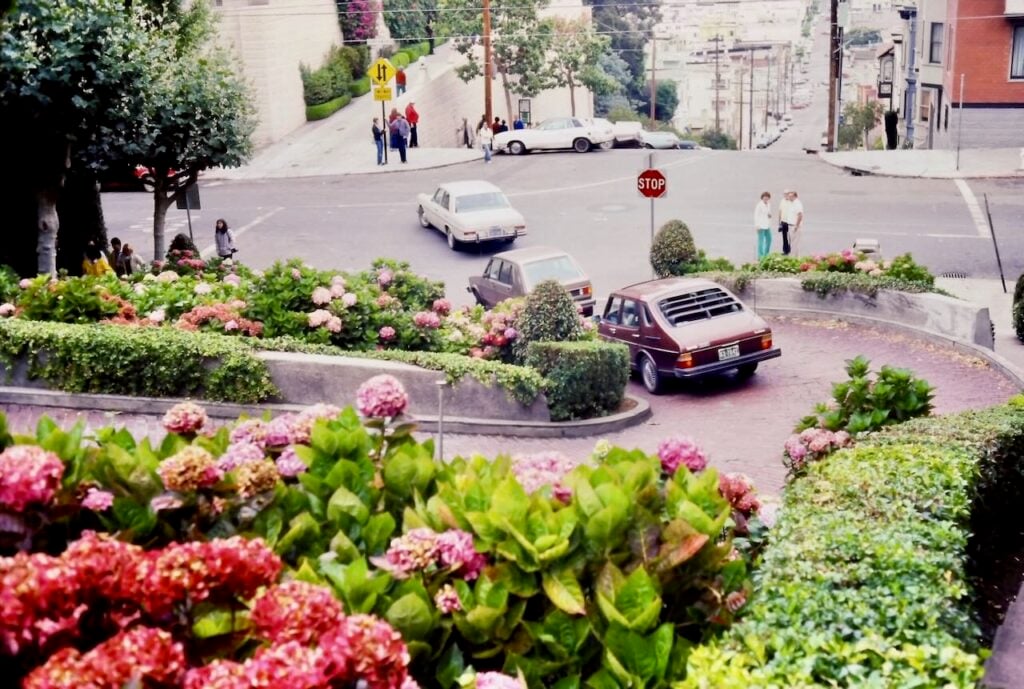
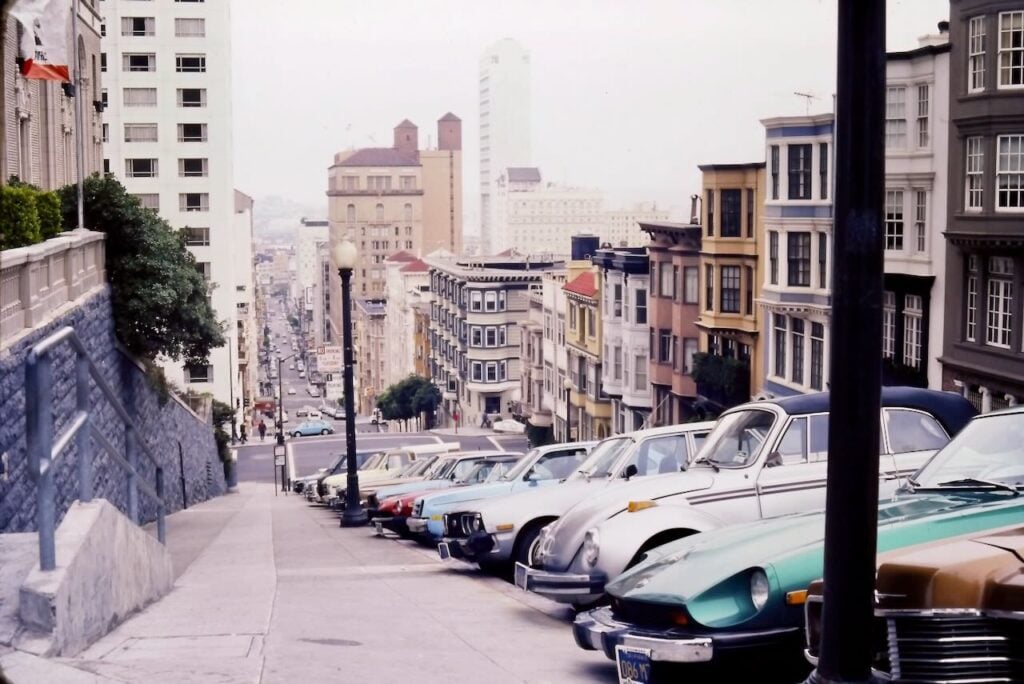
Here are some examples of scans of slides from the 1980s. I adjusted all of these images on my iPad using the methods outlined above:

Here are two images scanned from a film negative from the 1990s. The first scan was one that I did many years ago using a scanner that I no longer own:


Here are two more comparison photos. The picture was taken on my birthday in 1994 (the same year that I started practicing law). The first image was scanned from a film negative a very long time ago. It is grainy but has a little more detail. The second image was taken using the Kodak Slide N Scan. I prefer the second picture, but it is a little softer, which some could see as a disadvantage.


One minor drawback to this Kodak device is that there is some very slight cropping on the left and right side of images on a film negative. I usually didn’t even notice this, but it can make a difference in some images. For the few times that I wanted to ensure that I got the entire image, I scanned the negative twice, once with the negative a little more to the left in the Kodak scanner and once with the negative a little more to the right. Then I used Photoshop to merge the two photos to create a single, wider photo. I did that for the above photo, and in the wider version of the scan, you can see a second birthday card on the right:

How much better can a scan look when you pay more for a professional service? I didn’t test this myself, but when I was researching this device, I found this post by Audrie Storme in which she provided side-by-side examples of this Kodak scanner versus a professional service. The professional scans always seem to be a little better and, in some cases, are much better. But remember, you can do both. You can scan a large number of slides and negatives with this Kodak product, and then if any individual images are really special, you can send just those to a commercial service to get a better scan. When I started, I assumed that would be what I would do. But ultimately, I was happy enough with all of the pictures I created using this device, so I see no need to spend more money to get slightly better versions of any of these pictures.
Similar products
There are other slide and film scanners that are similar to the Kodak Slide N Scan Digital Film Scanner that I purchased. For example, Kodak itself sells a slightly less expensive product called the SCANZA (which is $149.99 on Amazon). When I was researching these products, I saw a number of complaints about the SCANZA because it lacks a protective door for the place where you slide the slides or film in, and as a result, it can easily collect dust. Dust is the big enemy of scanning slides and film; it is so tiny that you cannot see it on the film, but after you scan and look at the photo on a larger screen, it can be pronounced. That’s why I decided to spend just a tiny bit more on the Slide N Scan. The doors on the side of the Slide N Scan help to keep out dust, and the device comes with a cleaning tool that you can use to clean the glass inside of the device.
The Slide N Scan I purchased has a 5-inch screen. There is another version with a 7-inch screen, and that larger screen can even tilt. I recommend the 5-inch version. First, a 5-inch screen is more than big enough to see the image and press the button. Soon enough, you will see the pictures much larger once they are on your iPad or computer. Second, looking at pictures of the 7-inch device, it seems to me that the 7-inch screen is big enough that the buttons you press are somewhat awkwardly located behind the top lip of the screen. With the 5-inch version, the main button you press every time to create the scan is right at the top, not behind anything, and easy to reach.
A few other companies sell similar products for about the same price, and I cannot comment on their strengths and weaknesses. But I can say that I have no regrets about selecting this model.
Conclusion
If you don’t have many slides or negatives to scan, or if you have film from an event that is really important to you, like your wedding, you are probably better off paying for a commercial service. And if you want to do the scan yourself and don’t mind spending lots of time and money to maximize the quality, you’ll want to look at dedicated professional flat-bed scanners that handle film or dedicated products like the Epson or Plustek devices I referenced above.
But for an easy and simple solution that results in pretty good photos that are fun to view and share, the Kodak Slide N Scan Digital Film Scanner is a nice product. Now that I own it, when I discover more old slides or film negatives that I want to scan, I will already have what I need.
Click here to get the Kodak Slide N Scan Digital Film Scanner from Amazon ($179.99).

