Review: Scanner Pro 7 by Readdle — the best way to scan documents using an iPhone

Ever since I first started using an iPad in 2010, I’ve been moving towards a pure paperless practice.  I’m not 100% there yet, but with all federal court documents in PDF form and most of my colleagues and opponents in state court cases emailing scans of documents, I’m mostly there.  Whenever I do encounter paper, my #1 priority is to get it in a digital form.  We have nice combination copy machine/scanners in my office, and my secretary already knows to scan pretty much every piece of paper sent to me, but sometimes I encounter documents that I want to scan myself, especially when I am out of the office.  It has been several years since I have reviewed a scanner app, but as both scanning apps and the camera on the iPhone have improved over the years, it has become really easy to scan documents using an iPhone.  In my opinion, for a while now, the top three apps in this category have been Scanner Pro (which I last reviewed in 2012), PDFpen Scan+ (which I last reviewed in 2013), and Scanbot — an app that I have mentioned on iPhone J.D. but never formally reviewed, even though it has been my favorite scanner app for quite some time now.  A few weeks ago, Readdle updated Scanner Pro to version 7, and with the new features, it is now my favorite app for scanning on the iPhone. 

(And by the way, “Readdle” is pronounced REED-AL, not RE-AH-DAL.  I wasn’t really sure about that until I listened to this video from the company.)

The current versions of Scanner Pro, PDFpen Scan+ and Scanbot make it fast and easy to scan.  Once you are in the scanning mode, just point your camera at the document.  These apps will automatically detect the edges of the document and, once you are holding your hand steady, automatically take a picture of the document.  Better yet, in Scanner Pro and Scanbot, you can turn on a setting to automatically start taking a picture when you first launch the app, which makes sense to me because virtually every time I launch a scanner app I do so because I am ready to start scanning.

 

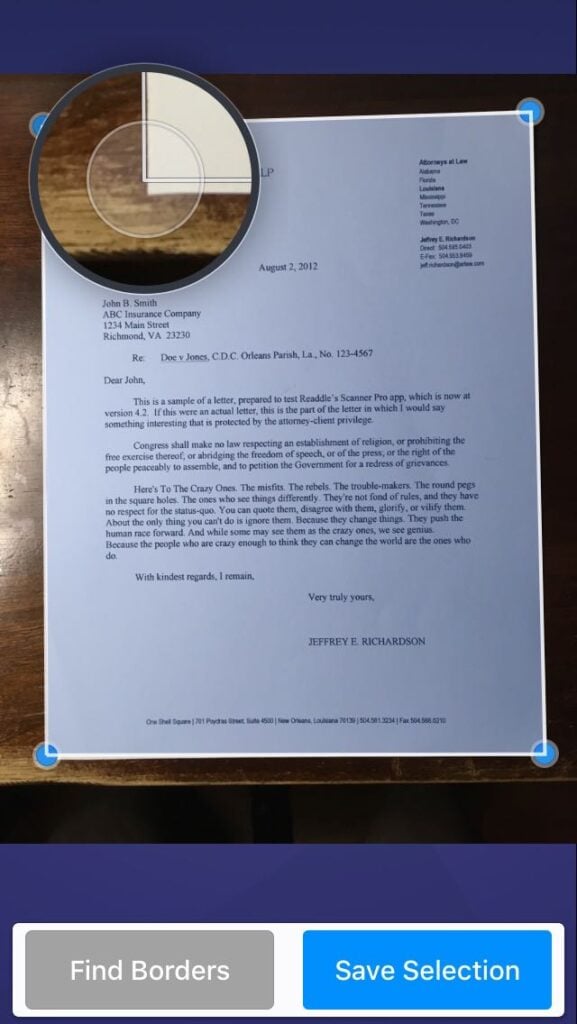
The edge detection in Scanner Pro is usually quite good, especially if you are scanning a white document against a darker background, such a desk with a dark color.  But if you need to adjust the edges, the app makes it easy to find the corners.
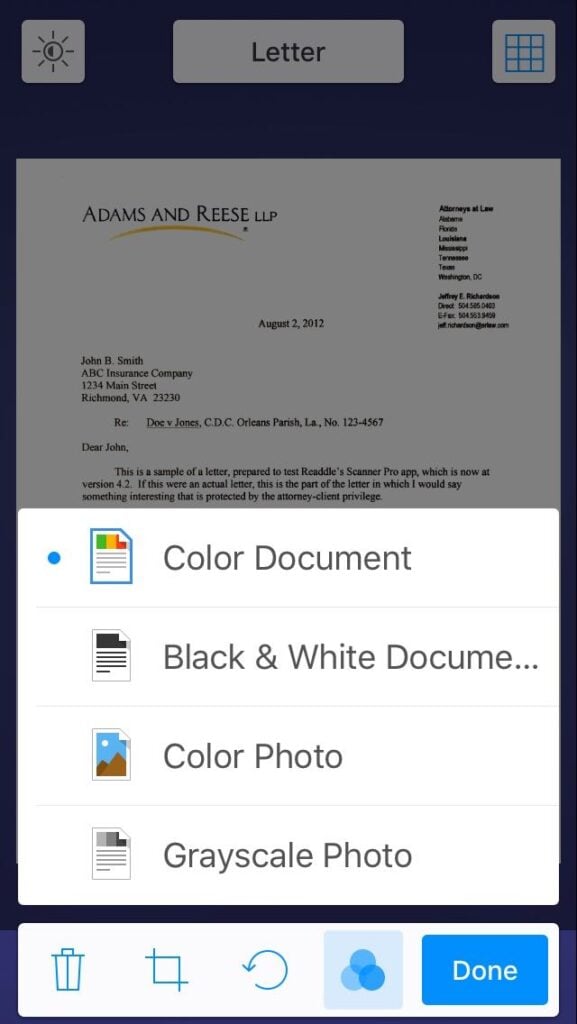
You can make a scan black and white, grayscale, or color.  If it is color, you have both a color photo option and a color document option.  The color document option ensures that all of the background on a white sheet of paper is white, even if the lighting or shadows made one part of the image slightly darker than another part.
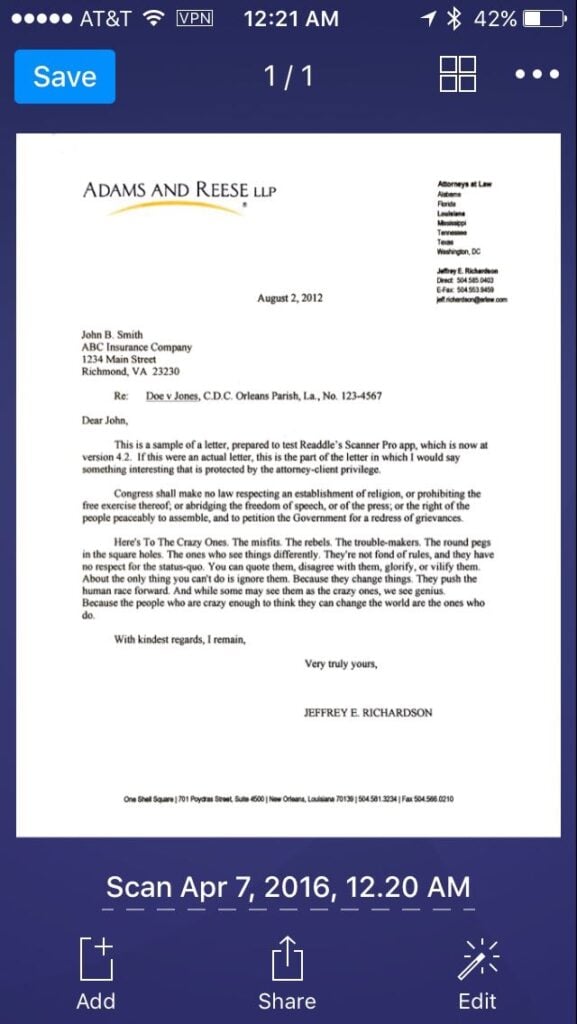
In Scanner Pro (just like PDFpen Scan+) it is fast and easy to scan multi-page documents.  Just scan the first page, then once the picture is taken move on to the next page.  (In Scanbot, you have to manually tap “Add page” to add additional pages, which slows down the process.)

Once you scan your documents, all three apps can perform an OCR of the document to figure out the words on the page.  In Scanner Pro and Scanbot, as long as you have the option to do so turned on in preferences, the OCR process starts automatically.  In PDFpen Scan+, you need to tap the OCR button to start the OCR process.  I prefer having the process start automatically because virtually all scanned documents are easier to work with when the document is OCR’d.

If you have a decent quality original, all three apps are excellent, but not perfect, when it comes to reading words.  In the pictures in this post, you can see that I scanned a document that I first created back in 2012 when I first reviewed Scanner Pro.  In my numerous tests, all three apps got almost every word right.  Scanner Pro was almost always confused by the word “thereof” followed by a semicolon in the second paragraph, thinking that it said “thereofi” or “thereo,f'” or something like that.  Scanbot and PDFpen Scan+ had no trouble with “thereof” but did stumble on the phrase “attorney-client” at the end of the first paragraph.  Both of those apps thought that “attorney” was “attomey,” even though Scanner Pro had no trouble with “attorney.”  I point all of this out merely to show that while you cannot count on the OCR being 100% perfect in these apps, it is going to be darn close, and I didn’t find any one app all that much better than the others.

Where Scanner Pro really shines is in the quality of its scans.  I’ve always found Scanner Pro and Scanbot scans to be slightly better quality than PDFpen Scan+ scans.  The words in the scans made with PDFpen Scan+ have more jagged edges, looking slightly more like a fax.  Click here to download an example of a PDF file created using Scanner Pro 7.

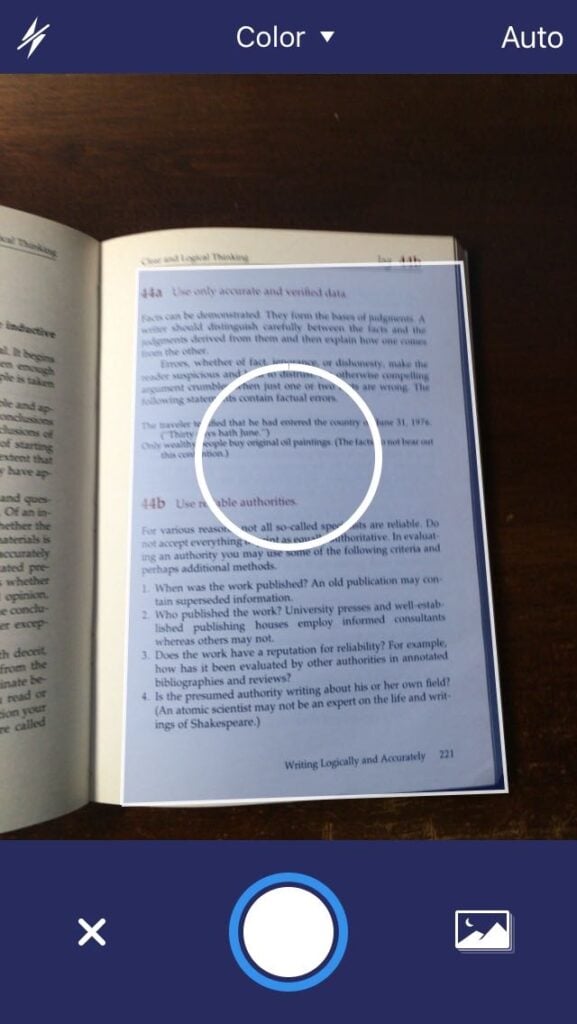
With Scanner Pro 7, Readdle made the scans even better when you are scanning a page in a book.  The problem with scanning books is that there is a curve on the page from the spine to the edge.  That’s why when you put a book on a copy machine / scanner, you often push down hard on the book to try to make it flat.  Scanner Pro has a new feature that automatically senses the curve of a book page and makes corrections to the distortion to straighten out each line of text — almost as if you had pushed the book down flat on a copy machine.  While not 100% perfect, it is always vastly better than the results I see when scanning a book page with Scanbot or PDFpen Scan+.
 

Scanner Pro also has a new workflow feature that you can use to automate what happens to a scan.  Once you scan a document, if you tap the share button, you will see a button for any workflow that you have previously created.  Just tap that workflow button, and the workflow starts.  You can set the workflow to do things like change the title of the file, automatically upload to a specific folder on a service like Dropbox, automatically email the scan to a certain person, etc.  So if you frequently scan a receipt and email a copy to your secretary to create a request for reimbursement, when Scanner Pro you can now do that with fewer taps once you set up the process once.
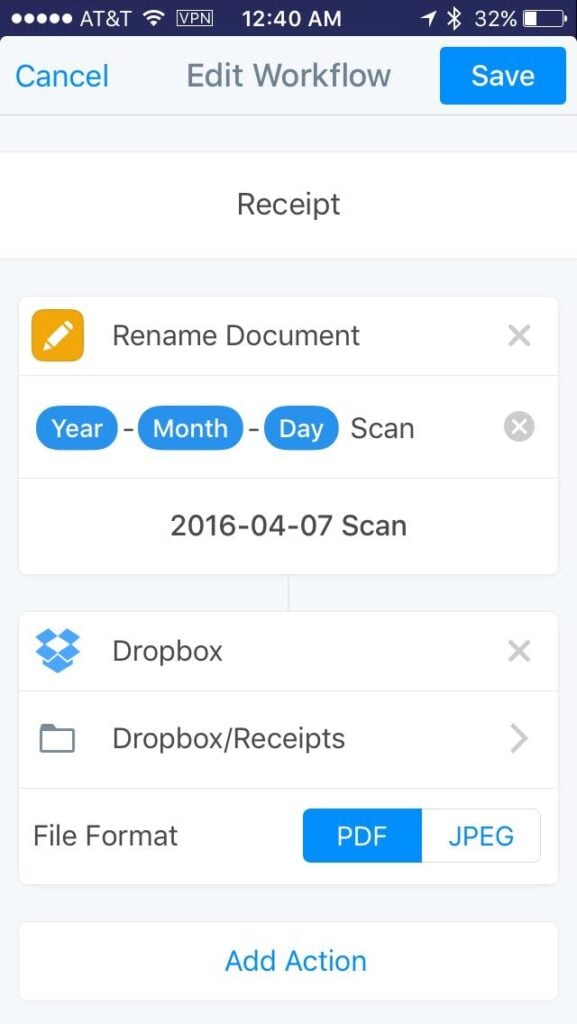
 

I find myself wishing that the workflow functions were more sophisticated.  For example, there is no option for text input, so while you can automatically rename a file to put the year-month-day at the start of the file name, you cannot then have the app ask you for words to put after that such as “Motion for Summary Judgment” or “Exhibit A” or “Affidavit” etc.  After using the impressive Workflow app for some time now, I find myself wanting to create more powerful workflows in this app.  But this is only the first version of the workflow feature, and hopefully Readdle will make workflows more robust in future updates.  Even in its current version, having this feature in Scanner Pro gives the app another leg up over Scanbot or PDFpen Scan+.

I prefer to scan documents using my iPhone, but Scanner Pro 7 is a universal app so it works on your iPad too.  If you have the iCloud function turned on, the app will share scans between multiple devices, so you can use the better camera on your iPhone to scan documents but then you can view you scans on your larger iPad screen.

Scanner Pro always did a great job with the basic functions of scanning a document.  But now that version 7 adds OCR — a feature that had already been in Scanbot and PDFpen Scan+ — as well as the book scanning and workflow features that are not offered in other scanning apps, Scanner Pro is now once again my favorite scanning app for the iPhone.  The app is quick and easy to use, it is either as good as or better than other scanning apps on all of the standard features, and it has some nice new bells and whistles for when you want to use them.  I recommend that all attorneys get a scanning app so that it is on your iPhone the next time that you need to scan a document, and with the latest update to Scanner Pro, this is now the app that I recommend.

Click here to get Scanner Pro 7 from Readdle ($3.99):  Scanner Pro

Review: iClever IC-BTS03 Waterproof Outdoor/Shower Bluetooth Speaker

The first time I heard mention of a Bluetooth speaker for a shower, it struck me as funny enough that I featured it as an “And finally…” item at the end of a Friday post back in 2012.  But then I tried out the iShower, and I actually found it sort of nice to have a Bluetooth speaker that I could use to listen to podcasts while in the shower, as I noted in my 2013 review.  My iShower lasted for about two years and then stopped working.  After a few months of not having a speaker in my shower, I decided to buy another one, and I purchased an Aukey Rugged Waterproof Bluetooth Speaker on Amazon.  It works okay, and the price was right (I paid $20; it currently sells for $22), but the tire design is a little too cute — especially because it results in buttons that are very difficult to find.  A few weeks ago, iClever sent me a free review unit of its iClever IC-BTS03 Waterproof Outdoor/Shower Bluetooth Speaker, which only costs $29.99 on Amazon.  I’ve been using it for a few weeks, and I like it.

Design

As you can see, the unit itself is a thick rectangle, almost a square.  It is 3.75″ across, 3.5″ from top to bottom, and 2″ thick.  The front and back are hard plastic.  The edges are a hard rubber, and the buttons on top are molded into the rubber.  A blue LED light on the front illuminates when the unit is on.  If powered off and charging, the LED is red, and it turns green when finished charging.  If powered on and charging, both the blue and red LEDs light up, producing sort of a purple color.

A rubber handle on the top right makes it easy to carry this speaker.

If you lift a tab on the left side of the speaker, you will see two ports:  a micro USB port for charging, and an AUX port.  I didn’t use the AUX port, and instead relied on its Bluetooth, version 3.0+EDR, to connect to my iPhone.

The button of the speaker has a screw hole that you could use to mount the speaker to a tripod or something similar.

iClever says that the 2000 mAh battery works for 8 to 10 hours on a single charge, which seems about right in my tests.  It takes 3 to 4 hours to charge the speaker.

Dust Proof and Waterproof

The key feature of this speaker is that it is waterproof.  It is rated IP65, which is a rating on the Ingress Protection scale established by the International Electrotechnical Commission (IEC).  The first of the two digits after the “IP” refers to the protection against solid objects getting inside of the device on a 0 to 6 scale, and the second digit refers to the protection against liquids getting in to the device on a 0 to 9K scale.  You can see the full scale here on Wikipedia

For this device the “6” is the highest level, meaning complete protection against dust getting inside of the device.  So you can use this device outside without fear of sand or dirt getting inside and damaging the electronics.

The second number is a “5” which means protection against water jets aimed at the device for at least three minutes.  This is lower than a “6” which would be protection against powerful jets, and is less than a “7” which means that it can go 1 meter underwater for 30 minutes.  The Apple Watch has IP7 water protection, which is why it will continue to work even if you dunk your wrist in water while wearing the watch — and why some people go swimming with an Apple Watch on, although I wouldn’t recommend that.

So with a “5” rating, you are not going to want to drop the iClever speaker into your tub, although if you drop it in and pick it up quickly you might be OK.  But if this speaker sits on a ledge in your shower and jets of water spray it from time to time, it will be fine because it is designed to handle that.

Note that if you use the AUX port to play music using a cord instead of Bluetooth, I doubt that the unit remains water resistant because you have to open the protective flap to access that port.

Music / Podcasts

There are four buttons on the top of the device:  power, volume down, play/pause and volume up.  The way that I use the device is I start playing something, typically a podcast, on my iPhone.  Then once in the shower I hold down the power button to turn on the speaker.  The unit turns on and automatically pairs with my iPhone and then continues to play whatever my iPhone was playing. 

The volume buttons are independent of the volume buttons on the iPhone — it is not a remote control for the iPhone’s volume.  Thus, if your iPhone volume is turned all the way up, then you can get the loudest possible sound on this speaker.  But if your iPhone volume is set to around 25%, then the volume buttons on the speaker will just go between 0% and 25%. 

You can also long press on the volume up or volume down buttons to advance to the next or previous track. 

The quality of the speaker is fine, but nothing special.  The sound is clear, but I in a quiet room when I can really hear the quality of music, I find it a little tinny with certain songs, although to be fair with other songs it sounds perfectly fine.  But in the shower, when the music is competing with the sound of a shower anyway, it is more than fine.  And since I virtually always use this speaker to listen to podcasts that I play on my iPhone using the Overcast app, most of my use of this device over the last few weeks has been with voices, which sound great.

I’ve been mostly using this as a speaker in the shower, but you could also use it as a portable outdoor speaker, and you don’t have to worry about it getting wet from rain or splashes.  It can get reasonably loud — not loud enough for a big party, but it would be fine for a smaller gathering, especially if you are just looking for background music.  The specifications say that the speaker is 50mm diameter with 5W RMS. 

Phone calls

You can also use this speaker to answer the phone and serve as a speakerphone.  I cannot begin to imagine using it for this function while in the shower — and hopefully you don’t take many phone calls in the shower either.  But if you are using this as an outside speaker, perhaps next to a pool while you are swimming and your iPhone is located in a safe location on a table, it is nice that you can answer calls using this device.  When the phone rings, you just long press on the play/pause button.  The other caller will definitely be able to tell from the sound quality that you are speaking on an inexpensive speakerphone, but it works.

You can also place a phone call from this speaker, but in a limited way.  If you long press on the play/pause button, the speaker will make your iPhone redial the last number that you called.  I suppose that this feature could be useful in some situations.  For me, this function just made me cautious that I was pressing the right button while using the speaker in the shower.  I was afraid that I would intend to long-press on the + button to advance to the next track, but instead I would long-press on the play/pause button and I’d call someone from my shower.

Conclusion

This is a nice, durable, inexpensive speaker that can work even when exposed to jets of water.  I’ll admit that listening to music or podcasts in the shower is an extravagance, but for only $30 it is an extravagance that you can afford.  And it works well as a portable outdoor speaker because you don’t have to worry about dust or splashes.  I see that there are other speakers for sale on Amazon that cost about the same and that are similarly resistant to water (although some are only rated IP54, not IP65) and I haven’t done a broad test of waterproof speakers.  But I can say that I like the design of this speaker better than the more expensive iShower that I reviewed in 2013 because it is more compact and the rubber and hard plastic makes it more durable.  I also like it better than the an Aukey Rugged Waterproof Bluetooth Speaker that I have been using since last November because the buttons are easier to press and the square shape makes it more sturdy.

Click here to order the iClever IC-BTS03 Waterproof Outdoor/Shower Bluetooth Speaker from Amazon ($29.99).

In the news

Apple is 40 years old today.  No other company has been selling personal computers for that long, and with its Mac, iPad and iPhone, Apple pushes the envelope on what it even means to be a “computer.”  As Apple celebrates its 40th, one of its newest devices, the 9.7″ iPad Pro, is now available in stores.  One of my law partners bought one, and I got a chance to spend a few minutes with it yesterday afternoon.  While I prefer the larger screen of my 12.9″ iPad Pro for viewing documents, I have to admit that the 9.7″ version has a lot going for it.  Most importantly for me, that classic iPad size is easier and lighter to hold.  The True-Tone display, available only on this model (for now), does a great job of adjusting the color balance automatically based upon the light that is around you.  I put the 9.7″ model next to my 12.9″ iPad Pro, and the color on my iPad looked great — until I looked at the color-balanced 9.7″ model.  Then when I looked back at my iPad, the white areas seemed too blue under the fluorescent lights in my office.  I’m sure that this feature will eventually be on all of the high-end iPads.  If you are now in the market for a new iPad, choosing between the two iPad Pro sizes will likely be difficult for many of you.  Some of the articles that I have linked below may help you to make your decision.  And now, the recent news of note: